

Are you going through this same issue and wondering what to do?
“When I turn on my MSI laptop, it powers on, the keyboard lights up, and the MSI Logo appears. Everything appears normal until my MSI laptop becomes stuck on the MSI screen with no response, it’s like the usual MSI logo screen appears frozen.”
Don’t worry, this is a common issue with MSI laptops, and in this article I will show you how to fix it step by step!
Why Is My MSI Laptop Stuck on the MSI Screen?
There could be several reasons for this issue, including:
- Problematic Windows updates.
- Faulty or unrecognizable internal system drive (HDD/SSD).
- One or all RAM sticks are faulty or not fully seated.
- The CMOS battery is depleted or dead.
- The BIOS may be corrupted or require an update.
- Damaged or outdated drivers.
- Corrupted system files which can make the Windows OS unable to load properly.
- Faulty motherboard.
- Incorrect Boot Order.
- Connected external devices.
9 Solutions to Fix a MSI Laptop That Is Stuck on the MSI Screen:
Now it’s time to talk about solutions, so here we go:
Fix 01 – Disconnect External Peripherals Devices


First thing you should do is disconnect any external peripherals devices connected to your MSI laptop—this include external storage devices, SD cards, USB drives, keyboards, mouses, printers, etc.
“why is that necessary?”
After pressing the power button and during the start-up process, your laptop must check and identify all connected external storage devices to determine which one is the system drive to boot from.
This may slow down the booting process or even cause your MSI laptop to fail to boot past the MSI logo screen.
Not just that, but also electrical conflict between the motherboard and connected devices is highly probable in these situations.
Fix 02 – Power Reset Your Laptop
I’m sure the first thing you tried was restarting your laptop, but it didn’t work.
That’s because in situations like this, you need to take it a step further and perform a power reset.
“Why, what’s the deference between a normal restart and what so called “power reset”?”
When you perform a power reset on your laptop, you disconnect it from all power sources (the power adapter and the battery) and discharge any remaining power, which will give your PC a fresh start and get rid of any hidden issues.
Here’s how to perform a power reset on your MSI laptop:
Step 01: Long-press the power button until the MSI laptop is completely turned off.


Step 02: Remove any external peripherals connected to the laptop. (In case you skipped Fix #01)


Step 03: Don’t forget to unplug the AC power adapter from the laptop.


Now, the next steps will differ depending on whether your MSI laptop has a removable, non-removable, or reset pinhole battery.
A) If You Have a Removable Battery:
Step 04: Flip the laptop and take the battery out.


Step 05: Press and hold the laptop’s power button for about 30 seconds to discharge any residual power.


Step 06: Now wait for 15 minutes before reinserting the battery back.
Step 07: The process is finished and you can now power ON your MSI laptop to check if it boots past the MSI screen.
B) If You Have a Battery Reset Pinhole:
At the bottom side of your MSI laptop, you will find a small pinhole that resets the battery or simulates removing and reinstalling the battery without dissembling the laptop. Thereby:
Step 04: Flip your laptop and then locate the battery reset pinhole, which typically has a battery icon with two rotating arrows.


Step 05: Gently insert a straightened paperclip into the reset hole and hold it there for 30 seconds.


Step 06: Now turn ON your laptop and check if the issue is gone.
C)If You Have a Non-removable Battery and No Reset Pinhole:
Step 04: Whilst the laptop is turned off, press and hold the power button for 30 seconds.
Step 05: Next, turn ON your laptop and check if it boots properly.
If the issue still persist after performing a power reset, move on to the next step.
Fix 03 – Boot the Laptop Into Safe Mode
If the MSI laptop is stuck on the MSI logo, booting your laptop into safe mode may be the solution for this issue.
Safe mode is a diagnostic mode that enables you to start your Windows system with the bare minimum and most essential drivers, programs, and services loaded.
So, if a third-party program, driver, or malicious software is causing this problem, you’ll be able to identify it by booting into safe mode.
To boot your MSI laptop in safe mode from the logo screen, follow these steps:
Step 01: Whilst the laptop is stuck on the logo screen, long-press the power button to shut it down.
Step 02: Then press the power button again to turn ON your laptop.
Step 03: When you see the MSI logo screen, hold down the power button and turn OFF your laptop.
Step 04: Again, turn ON your laptop, and once the MSI logo appear, hold down the power button to it turn OFF.
Step 05: Repeat this process until you see “please wait”; then, allow the laptop to take you to the recovery menu.


Step 06: Now, and on the “Choose an option” screen, navigate to Troubleshoot > Advanced options > Startup settings > Restart.


Step 07: The laptop will restart, and a list of options should appear, select option “5) Enable Safe Mode with Networking“ by pressing the Num 5 key.


If your MSI laptop successfully enters safe mode, then it’s likely that a third-party driver, file, or software is causing the issue; in this case, you should run Automatic Startup Repair.
If not, and your laptop fails to enter safe mode, try running Automatic Startup Repair as the next step.
Fix 04 – Run Automatic Startup Repair
As its name implies, the Automatic Repair (Startup Repair) tool helps you diagnose and fix most of boot or startup-related issues.
For example, it looks through startup log files to identify the issue’s root cause before attempting to fix it.
Therefore, if your MSI laptop cannot boot past the MSI startup screen, you must launch the Startup Repair tool. Here’re the steps:
Step 01: While the machine is stuck on the MSI screen, press and hold the power button to turn it off.
Step 02: Press the power button and turn ON your laptop.
Step 03: When you see the MSI logo screen, hold down the power button and turn OFF your laptop again.
Step 04: Repeat this “turning OFF/ON using the power button” process until the “please wait” message appears; then let the laptop display the recovery menu.
Step 05: From the “Choose an option” screen, navigate to Troubleshoot > Advanced options > Startup Repair.


Now, the Startup Repair tool will begin diagnosing your laptop for boot problems and, if possible, repairing them.


Simply wait and let the tool complete its task.
Fix 05 – Reset BIOS to Default Settings
During the computer’s booting process, the BIOS is the first program to be loaded into memory. Its purpose is to check whether the motherboard and other basic peripherals, such as the keyboard, hard drive, monitor, and so on, are functioning properly.
That’s all fine until, the BIOS configuration data stored within the battery-backed CMOS memory chip become corrupted or invalid due to a variety of factors like as power outages, wrong configurations, hardware incompatibilities, and so on.
In such cases, the solution is to restore the BIOS or CMOS settings back to their factory defaults by removing or reseating the CMOS battery on your laptop’s motherboard.
“So how to do so?”
Step 01: Shut down your MSI laptop and unplug the power adapter.
Step 02: Unscrew the laptop’s bottom cover to have access to the motherboard.


Step 03: Ensure that the battery is unplugged or disconnected to prevent electrical damage to the motherboard.


Step 04: In some MSI modules, the CMOS battery is easily accessible and located on the surface of the motherboard; therefore, simply remove it, wait a few minutes, and then reinstall it.


Step 04: However in other MSI modules, the CMOS battery sits beneath the motherboard; therefore, you must locate its port and detach its connector with caution, wait a few minutes, and then reattach it back.


Step 05: Plug the battery back and reinstall the laptop’s bottom cover.
Now, go ahead and power on your MSI laptop and see if it’s still stuck on the MSI screen.
Fix 06 – Check the RAM Sticks
If one or more RAM modules are faulty, incorrectly seated in their slots, or if dust has accumulated on the RAM contacts and slots, the motherboard may fail to load essential data into RAM, which results in the laptop being stuck on the MSI screen.
To rule out RAM as the source of this issue, take the following steps:
Step 01: Turn off your laptop completely and disconnect it from the power adapter.
Step 02: If you have a removable battery, take it out before unscrewing the back cover.
Step 03: Unscrew the back cover of your laptop to access it’s motherboard.

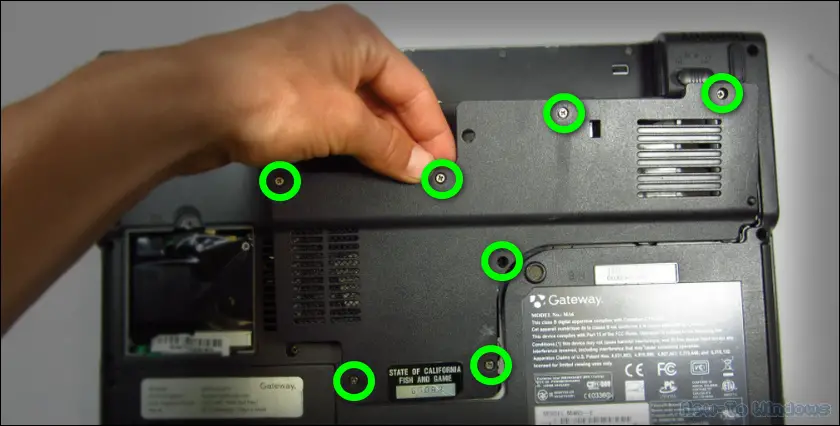
Step 04: If you have an internal non-removable battery, unplug it before proceeding to the next step.
Step 04: Locate the RAM sticks and remove them by releasing their latches. (Note: Hold the RAM sticks by their edges to avoid touching the connectors).


Step 05: Examine the RAM cards for burns or other visible damage. If you notice any, replace them.


Step 06: Clean the RAM gold connectors of accumulated dust with a soft cloth and compressed air duster.


Step 07: After that, clean the RAM slots with a tooth brush.


Step 08: Insert the RAM sticks back into their slots and ensure they are seated correctly.
Step 09: Place the battery and back cover where they belong.
Done!!
You can now switch on your MSI laptop and see if it boots normally or remains stuck on the MSI logo screen.
Fix 07 – Check the Boot Order in BIOS
During startup, the boor order configuration in the BIOS determines with device has the boot priority, meaning which storage device your laptop must try to boot from first.
Therefore, if the boot order is incorrect, or if it is NOT configured to prioritize the correct system drive, your laptop will face difficulties, causing it to get stuck on the MSI screen.
To check the boot order priority and make sure it’s set on the correct system drive, follow these steps:
Step 01: If your MSI laptop is ON, shit it down.
Step 02: Turn on your laptop by pressing the power button, then immediately begin pressing the Del key repeatedly to access the BIOS menu.

Step 03: When entering BIOS, ensure that you are in Advanced Mode.


Step 04: Navigate to Settings then select Boot.


Step 05: Under “Fixed Boot Order Priorities” select Boot Option#1.

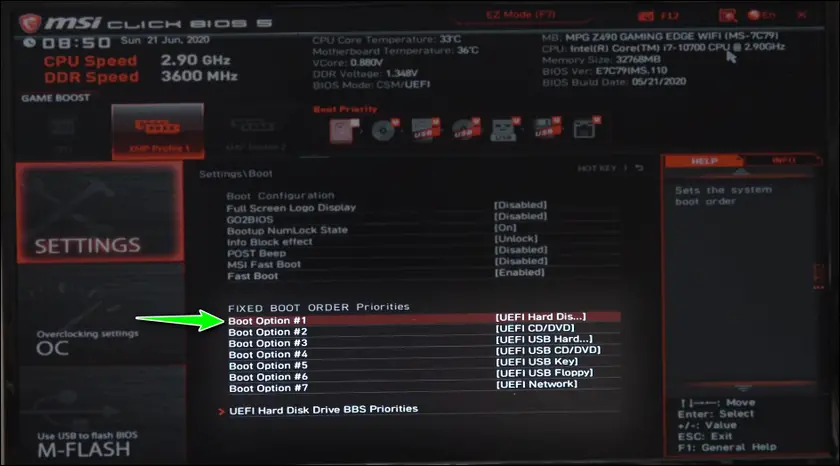
Step 06: Make sure the Boot Option#1 is set on Hard Disk.


Step 07: Next, go to UEFI Hard disk Driver BBS Priority.


Step 08: Select Boot Option#1, then make sure it is set on the correct system drive.


Step 09: Finally, go back to Save & Exit and select YES.


After your laptop restarts, it will automatically boot to the system drive you selected.
Fix 08 – Ensure the System Drive (Boot Device) Is Detected
The internal system drive (HDD/SSD) may be faulty or disconnected, making it unrecognizable for the laptop. In this case, there is no boot device, and the laptop remains stuck on the logo screen.
Therefore, you have to check the BIOS for all detected drives to determine if the system drive is among them:
Step 01: If your MSI laptop is ON, shit it down.
Step 02: Power on your laptop, then immediately begin pressing the Del key repeatedly to access the BIOS menu.
Step 03: Ensure that you are in Advanced Mode.
Step 04: Go to Settings > System status.

Step 04: Make sure the system drive (the boot device) is detected and listed.


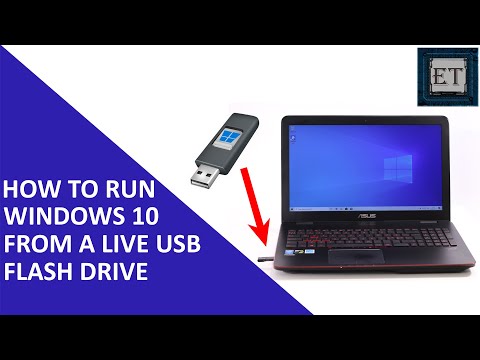
If the system drive is NOT detected: it may be disconnected or dead, in which case you should disassemble your laptop and ensure the drive is properly plugged in. You can also try another boot device, such as a Windows live USB flash drive.
If the system drive is detected: This is a good sign; however, there is still a chance that it is defective, so try to boot Windows from a USB flash drive.
If you are then able to access the Windows environment from the live USB flash drive, either the original main internal drive (HDD/SSD) or the Windows system files are damaged.
In any case, try reinstalling the operating system and see what happens.
Fix 09 – Reinstall Windows OS
Simply create a bootable Windows 10/11 USB drive, and then try to install the fresh operating system on your main system drive.
After the installation is done, If the MSI laptop can boot to the system without issues, it suggests that previous system files are most likely corrupted.
If not, and reinstalling Windows OS on your internal system drive fails, then the drive you are using is probably defective and must be replaced.
Conclusion
Experiencing these issues, which make it appear as though the laptop is permanently defective, can be frustrating.
However, it’s entirely manageable if you follow the correct troubleshooting steps discussed earlier.
Yet, if you cannot fix this issue on your own, you should seek professional assistance.
