


Over the years, Windows has grown to be the most popular and widely used operating system worldwide due to its many advantages over other competing systems.
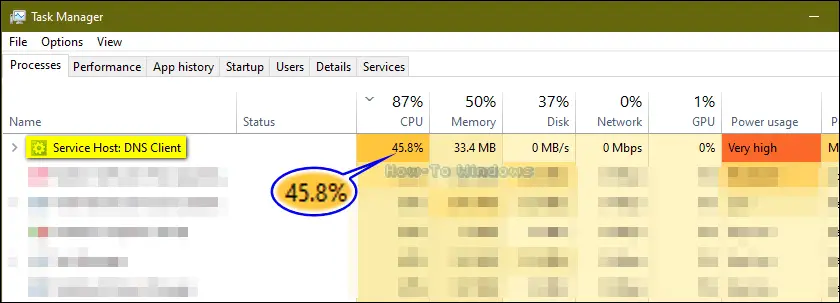
However, one of the frustrating problems that Windows users frequently experience is when Windows services, such as the Service Host DNS Client, start consuming an excessively high amount of device resources (CPU, Memory, etc.), which results in unresponsive, sluggish system performance.

In this article, I will walk you through the reasons behind the ‘Service Host DNS Client high CPU usage’ issue, and most importantly, how to resolve this issue and restore your computer’s normal performance.
What to Do if the DNS Client Service Is Causing High CPU Usage
- Look Into What’s Triggering This Issue
- Fix 01: Restart the DNS Client Service
- Fix 02: Clear the DNS Cache
- Fix 03: Roll Back the Newly Installed System Updates
- Fix 04: Perform a System Restore
- Fix 05: Disable the DNS Client
What Is “Service Host: DNS Client”?
In conclusion, the DNS Client service is a background Windows process that manages network communication between your computer and Domain Name System (DNS) servers.
For example, When you search for a website using its domain name (such as www.example.com), the DNS server translates the domain name into an IP address (such as 204.80.163.100) that your computer understands and uses to establish a connection with the desired website.
Why Does DNS Client Cause High CPU Usage?
The DNS Client service’s excessive CPU usage may be the result of several other issues that I like to call “factors”, including but not limited to:
- System bugs or glitches.
- Corrupted DNS cache.
- Large hosts file that requires a lot of CPU resources to process and run through.
- Slow or unresponsive DNS servers.
- High volume of DNS queries that overload the DNS client.
- Corrupted network drivers.
- Malware infection.
- Misconfigured firewall or antivirus settings.
- Software/services conflicts.
5 Solutions to Fix the DNS Client Service’s High CPU Usage
To troubleshoot and fix the high CPU usage caused by the DNS Client service, implement each of the following solutions in order:
Fix 01 – Restart the DNS Client Service
Let’s start simple by restarting the DNS Client service, which is an effective troubleshooting step to resolve all kinds of DNS-related issues.
When you restart the DNS Client Service, you refresh the service and clear any temporary bugs, glitches, or conflicts that could be causing the high CPU usage.
Now, let’s get to action; to restart the DNS Client service, follow these steps:
Step 01: Open the Start menu, type cmd in the search box, then run Command Prompt as administrator.


Step 02: In the Command Prompt window, type net stop dnscache and press Enter. This command will stop the DNS Client service (Note: you may see something like “the DNS Server service is stopping”).


Step 03: After that, to start the DNS Client service again, type net start dnscache and press Enter.


Fix 02 – Clear the DNS Cache
The DNS cache stores data about previously visited websites and their corresponding IP addresses.
However, over time, this cache can become corrupted or large, resulting in DNS-related problems, including the high CPU usage caused by the DNS Client.
Therefore, you should clear or flush the DNS cache to eliminate any cache-related issues, and allow the DNS Client to rebuild the cache with fresh data.
To clear the DNS cache, follow these steps:
Step 01: Press the Windows+R keys combination to open the Run box.


Step 02: To open the Command Prompt type cmd and press Enter.


Step 03: Next, type ipconfig /flushdns and press Enter. This command will flush the DNS cache and clear any stored DNS records.


When you see the message “Successfully flushed the DNS Resolver Cache,” it indicates that the clearing operation was successful.
Now, you can check through the Task Manager whether the high CPU usage issue has been resolved or not.
if not, move on to the next step.
Fix 03 – Roll Back the Newly Installed System Updates
Some users who experienced the same DNS client high CPU issue reported that it occurred for the first time immediately after installing a new Windows update.
“Can you explain why?”
Most likely, the new system updates include bugs that impact the DNS client service and other Windows system components, resulting in abnormally high CPU usage, plus other possible system issues like the empty taskbar with an infinite loading cursor.
If this is the case, you’ll need to roll back (uninstall) the recently installed updates. Here’re the required steps:
Step 01: Open the Settings app using the Windows+i shortcut.


Step 02: Click on Update & Security.


Step 03: Navigate to Windows Update > View update history.


Step 04: Select the Uninstall updates option.


Step 05: Locate the most recent update (aka the one after which the issue appeared) and uninstall it.


Step 06: Wait for the uninstallation process to finish, after that restart your PC and check the DNS client’s resource consumption using the Task Manager.
Fix 04 – Perform a System Restore
A system restore will undo every change you made to the system settings, system files, and installed programs, and will return the operating system to a stable earlier state, or the state it was in before the problem appeared.
For this reason, many users have reported that performing a system restore to a point before the high CPU usage issue began was effective in resolving the problem.
Here’re the steps to perform a system restore:
Step 01: Open the Run command box, type rstrui and press Enter.


Step 02: After the System Restore window appear, press Next.


Step 03: Select the restore point you want to revert to, and press Next.


Step 04: Click Finish to start the system restore process.


Step 05: Wait for the system restore to complete fully, and ensure not to interrupt the process. After that you can check if the issue is gone.
Fix 05 – Disable the DNS Client
If none of the aforementioned solutions worked for you, your only remaining option is to disable the DNS Client—which seems to do the trick for many users.
Before disabling the DNS Client, however, you must first manually assign the DNS servers that your computer will use for DNS resolution.
This can be accomplished by directly entering the IP addresses of the desired DNS servers into the network adapter settings. Here’re the steps to do so:
Step 01: Press the Windows+R keys on your keyboard to open the Run box.
Step 02: Type control then press Enter to open Control Panel.


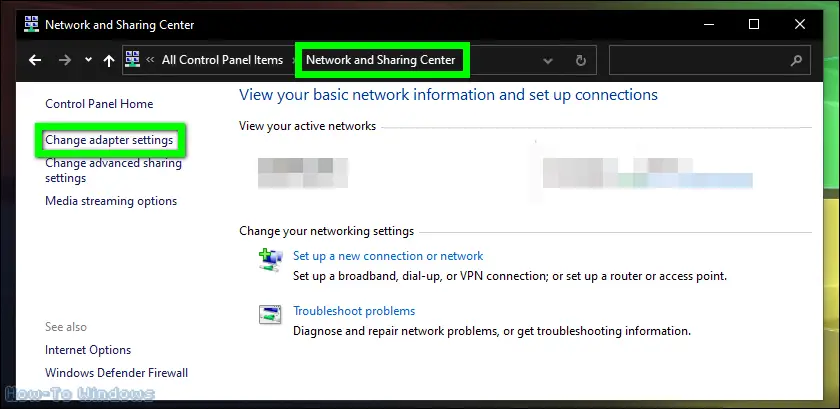
Step 03: Navigate to Network and Sharing Center > Change adapter settings.

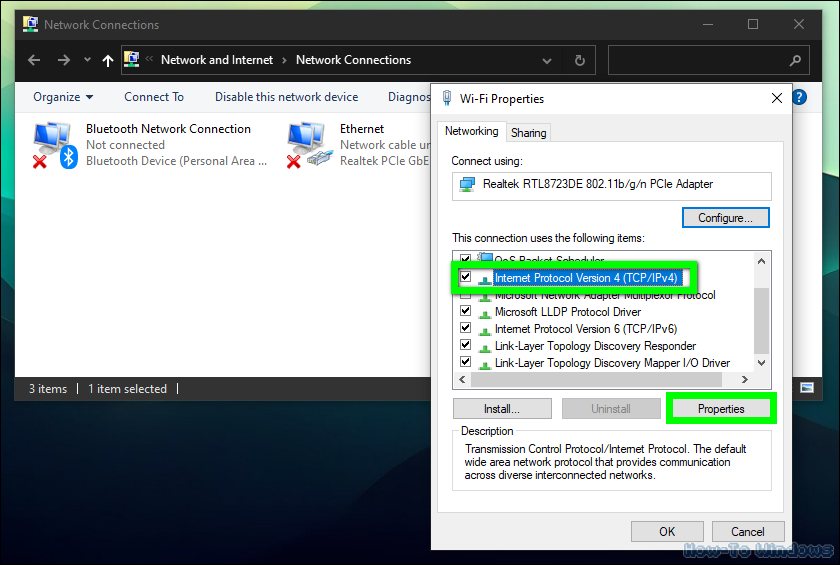
Step 04: Right-click on your current network connection, and select Properties.


Step 05: In the Networking tab, look for Internet Protocol Version 4(TCP/IPv4), select it, and then click the Properties button.

Step 06: In the General tab, select Use the following DNS server addresses, and then enter the Google Public DNS IP addresses as follows:
- Preferred: 8.8.8.8
- Alternate: 8.8.4.4


Step 07: Don’t forget to press OK. After that close all opened windows.
Step 08: To ensure that the changes take effect, restart your computer.
After manually establishing the DNS servers that your computer should employ for DNS resolution, it’s now time to disable the DNS Client service:
Step 01: Run Command Prompt as administrator.


Step 02: Copy and paste the following command and press Enter:
reg add "HKLM\System\CurrentControlSet\Services\Dnscache" /v "Start" /t REG_DWORD /d "4" /f


Step 03: When the process is finished, restart your computer.
Step 04: After restarting your computer, the DNS Client service should be disabled; you can now access the Task Manager, where the high CPU usage issue should be gone as well.
If, for some reason, you need to re-enable the DNS Client service, simply re-run CMD as administrator, then copy and paste the following command and press Enter:
reg add "HKLM\System\CurrentControlSet\Services\Dnscache" /v "Start" /t REG_DWORD /d "2" /f
Lastly, don’t forget to restart your computer so the changes to take effect.
##Bottom Line
If the DNS Client service is consuming a large amount of CPU resources and affecting the performance of your computer, you can follow the troubleshooting steps outlined in this article, such as flushing the DNS cache, uninstalling recently installed system updates, or disabling the DNS Client service.
Finally, If you have any questions or suggestions that may assist other users in resolving this DNS Client issue, please share them in the comment section.
